🚴 Overview
Maximum Trainer is a free, open-source indoor cycling and rowing training application. It connects to smart trainers, power meters, heart rate monitors, and cadence sensors over Bluetooth LE (BLE), runs structured interval workouts in automatic ERG mode, and exports completed activities to the Garmin FIT format for upload to Strava, TrainingPeaks, and SelfLoops.
BLE Sensors
Heart rate, power, cadence, speed, and muscle oxygen via standard BLE profiles.
ERG Mode
Automatic resistance control — just pedal at the right cadence and hit your target power.
Workout Library
Sync structured workouts from Intervals.icu, plus import your own .erg / .mrc / .zwo files.
Activity Upload
Post-workout upload to Strava, TrainingPeaks, and SelfLoops — directly from the app.
This guide assumes Maximum Trainer is already installed on your computer. If you need installation instructions, see the README on GitHub.
🚀 First Launch & Login
On first launch, Maximum Trainer displays a login screen. You can connect with your Intervals.icu account via OAuth, or choose Offline Mode to train without an internet connection. Your Intervals.icu credentials are stored securely in the platform keychain — you will not need to log in again on the same machine.
Option A — Sign in with Intervals.icu (recommended)
- Launch MaximumTrainer from your Start Menu, Applications folder, or desktop shortcut.
- On the login screen, click Connect with Intervals.icu.
- An embedded browser window opens showing the Intervals.icu authorisation page. Log in with your Intervals.icu credentials and click Authorise.
- Maximum Trainer exchanges the authorisation code for an access token and stores your credentials securely. The Main Window opens immediately.
Option B — Offline Mode
- Launch MaximumTrainer.
- On the login screen, click Continue Offline.
- The Main Window opens. All core features — ERG control, sensor recording, and workout playback from your local library — work without an internet connection. Intervals.icu calendar sync and cloud upload are not available in offline mode.
👤 User Profile & FTP
Maximum Trainer uses your Functional Threshold Power (FTP) and body weight to calculate training zones and relative power (W/kg). Setting these values correctly ensures ERG targets and zone boundaries are accurate.
- Open Preferences → Preferences & Profile from the menu bar (or the gear icon in the toolbar).
- Select the User Profile tab.
- Enter your FTP (in watts). If you don't know your FTP, a value of 200 W is a reasonable starting point.
- Enter your body weight (in kg).
- Adjust heart rate zones if desired (default zones are percentage-based on your max HR).
- Click Save.
📡 Connecting Your Sensors
Maximum Trainer communicates with cycling hardware over Bluetooth Low Energy (BLE). Before connecting, make sure your devices are awake and within range (typically 10 m).
Waking up your devices
| Device | How to wake it |
|---|---|
| Smart trainer | Start pedalling for a few seconds |
| Power meter | Start pedalling |
| Heart rate strap | Moisten the electrode contacts and put it on |
| Speed / cadence sensor | Spin the crank or wheel |
| Moxy muscle-oxygen sensor | Press the activation button or begin exercise |
Pairing sensors in the app
- From the main window, open Preferences → Device Connections (or the Bluetooth icon in the toolbar).
- Click Scan / Add Devices. The BLE scanner lists every nearby Bluetooth LE device.
- Select the correct BLE profile for each device from the list below.
- Click Connect. A green indicator confirms the sensor is active.
- Repeat for additional sensors. You can pair multiple devices simultaneously (e.g. an FTMS smart trainer and a heart rate strap).
| Profile | BLE UUID | Data provided | ERG control |
|---|---|---|---|
| Fitness Machine (FTMS) | 0x1826 |
Speed · Cadence · Power | ✅ Yes — automatic resistance |
| Cycling Power | 0x1818 |
Power (W) · L/R Balance | ❌ No |
| Heart Rate Monitor | 0x180D |
Heart rate (bpm) | ❌ No |
| Cycling Speed & Cadence | 0x1816 |
Speed (km/h) · Cadence (rpm) | ❌ No |
| Moxy Muscle Oxygen | 0xAAB0 |
SmO₂ (%) · tHb (g/dL) | ❌ No |
bluetooth group and the BlueZ daemon is running. See the
Linux Bluetooth Setup
section of the README.
🎮 Simulation Mode
If you have no Bluetooth hardware available — or simply want to preview a new workout — choose Simulation in the connection dialog. The built-in simulator generates realistic, gently drifting sensor values and responds to ERG load commands, giving you a full end-to-end test of the training logic without any physical devices.
- When the connection method dialog appears, select Simulation instead of BTLE Device.
- Choose a workout and press Start.
- The simulator immediately begins emitting data — no hardware required.
| Channel | Base value | Range |
|---|---|---|
| Heart rate | 140 bpm | 125–165 bpm |
| Cadence | 90 rpm | 80–100 rpm |
| Speed | 28 km/h | 23–33 km/h |
| Power | 200 W | 170–260 W |
🔍 Finding Workouts
Option A — Intervals.icu calendar sync
Maximum Trainer integrates directly with Intervals.icu — the popular free training platform — to pull your scheduled workouts into the app.
- Open Preferences → Preferences & Profile and go to the Connections tab.
- Enter your Intervals.icu API key and Athlete ID (found at intervals.icu → Settings → API), then click Save.
- Click the Intervals.icu tab in the left sidebar of the main window.
- Use Refresh to load your planned workouts for the current week.
- Select a workout and click Load Selected Workout to download it to your local library.
- The workout appears in your library list immediately, ready to start.
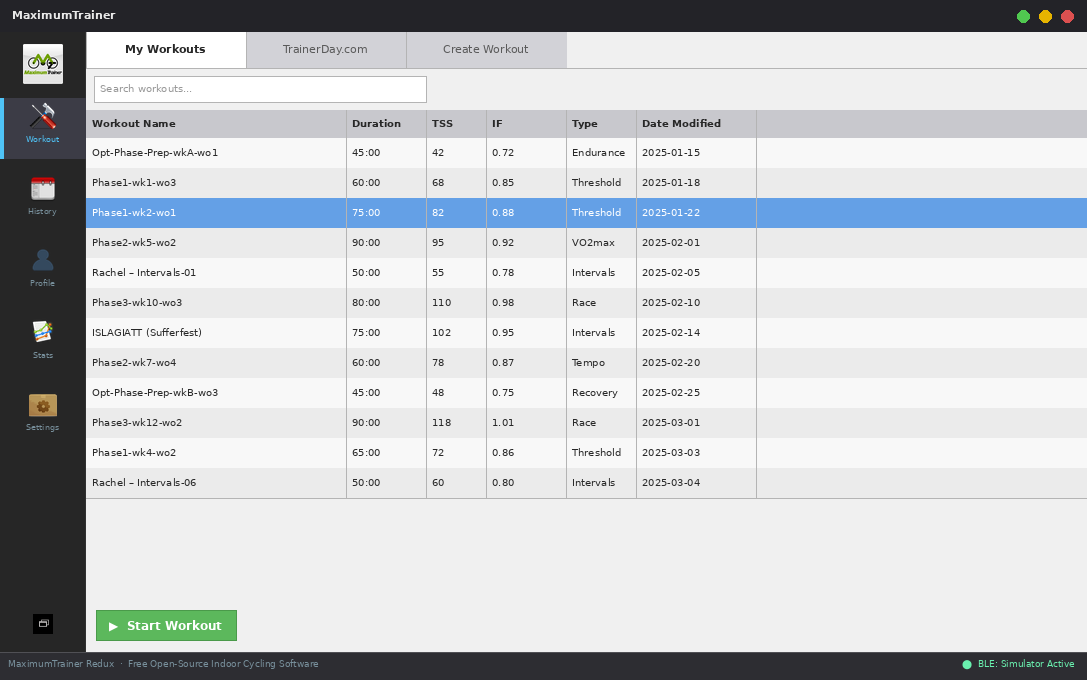
Option B — Browse existing library
Previously downloaded workouts are listed in the Workouts tab of the main window. Use the search/filter bar at the top to quickly find a specific session by name, duration, or workout type.
📂 Importing Workouts
If you already have workout files from another application (TrainerRoad, Zwift Companion, Intervals.icu, etc.), you can import them directly into Maximum Trainer.
Supported import formats
| Format | Extension | Source applications |
|---|---|---|
| CyclingPeaks / TrainerRoad ERG | .erg | TrainerRoad, custom scripts |
| CyclingPeaks MRC | .mrc | TrainerRoad, PerfPro, various |
Importing a single workout file
- Go to File → Import Workout in the menu bar.
- Navigate to your
.ergor.mrcfile and click Open. - Maximum Trainer converts the file to its native XML format and adds it to your library.
Importing a folder of workout files
- Go to File → Import Course Folder.
- Select the folder containing your
.erg/.mrcfiles. - All compatible files in the folder are batch-imported at once.
✏️ Creating Custom Workouts
The built-in Workout Creator lets you design your own structured interval sessions — specify target power (as absolute watts or % FTP), cadence, or heart rate for every segment, add repeats, and save for immediate use.
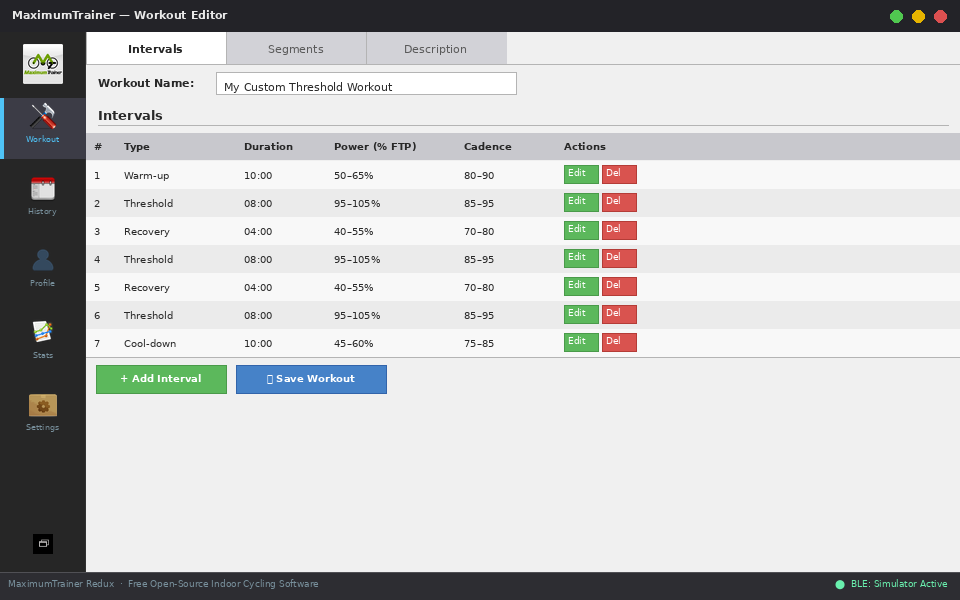
- Click the pencil / Workout Creator icon in the toolbar (or go to File → New Workout).
- Enter a name, optional description, and workout type (cycling / rowing).
-
Add intervals using the Add Interval button:
- Set the duration (minutes:seconds).
- Set the target — Power (W or % FTP), Cadence (rpm), or Heart Rate (bpm).
- Choose Ramp if the power should smoothly transition from the previous segment.
- Use Add Repeat Block to wrap a set of intervals in a repeat loop (e.g. 4 × 4 min at 105 % FTP).
- Drag rows in the interval table to reorder segments.
- The graphical preview at the top updates in real time as you add and edit intervals.
- Click Save. The workout is added to your library immediately.
⚙️ ERG vs Slope Mode
Maximum Trainer supports two resistance modes when connected to a smart trainer. Understanding the difference is key to getting the most out of your sessions.
| Mode | How it works | Best for |
|---|---|---|
| ERG | The app continuously adjusts trainer resistance so your actual power output matches the interval target. You only need to control cadence. | Structured interval workouts with power targets |
| Slope / Manual | The app sends a constant simulated incline (grade %) to the trainer. Resistance increases naturally with speed, just like riding a hill outdoors. | Free-riding, ramp tests, courses, race simulations |
ERG tips
- Maintain a smooth, consistent cadence (85–95 rpm is typical). Abrupt cadence changes cause the trainer to momentarily over- or under-correct resistance.
- When a new interval starts, give the trainer 5–10 seconds to settle at the new target.
- If a target feels too hard or too easy, use Adjust Difficulty (±5 % FTP per press) to scale the entire session without stopping.
▶️ The Workout Player
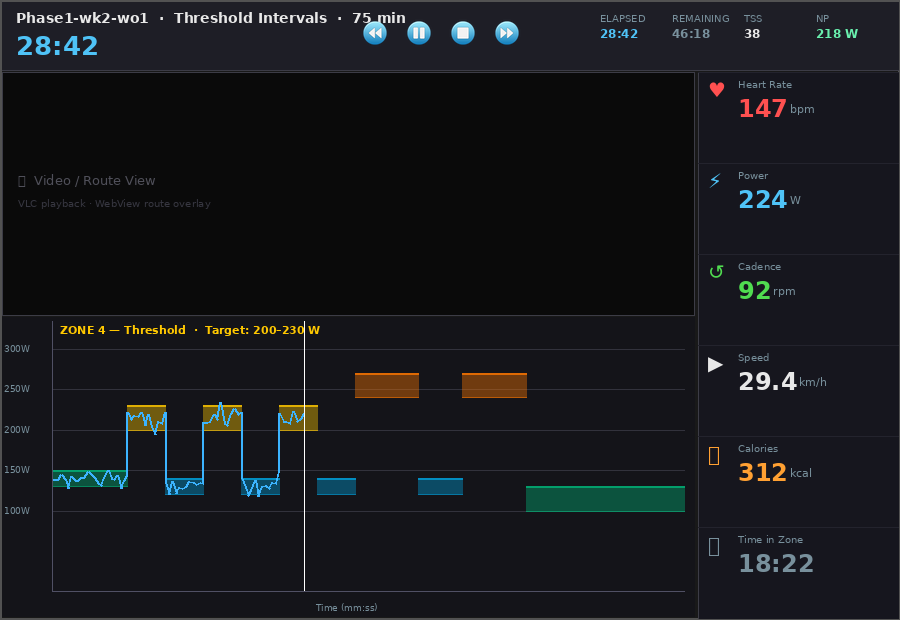
The workout player is the central screen during a training session. It combines a real-time power graph, live sensor metrics, interval information, and playback controls all in one view.
Display elements
| Element | Description |
|---|---|
| Interval graph | Coloured target-power band with your live wattage overlaid as a line. Each zone has a distinct colour matching standard training zones. |
| Interval countdown | Time remaining in the current interval, displayed prominently at the top. |
| Workout time | Total elapsed time and total remaining time for the full session. |
| Power | Live power output in watts from your trainer or power meter. |
| Heart rate | Live beats per minute from your HR strap, colour-coded by zone. |
| Cadence | Live pedalling cadence in rpm. |
| Speed | Live speed in km/h. |
| L/R Balance | Left/right power split (%) — only shown when a dual-sided power meter is connected. |
| SmO₂ / tHb | Muscle oxygen saturation and total haemoglobin — only shown when a Moxy sensor is connected. |
| Calories | Estimated kilojoules / kcal burned, calculated from power data. |
🎛️ During a Workout
Starting a workout
- Select a workout in the main window and click Start Workout (or double-click the workout).
- Choose your connection method: BTLE Device (real hardware) or Simulation.
- The workout player opens and begins the pre-ride countdown.
- Start pedalling — the ERG controller begins adjusting resistance immediately.
Playback controls
| Control | Action |
|---|---|
| Pause / Resume | Temporarily pauses the workout timer and sets trainer load to 0 W. Press again to resume. |
| Skip Interval | Immediately jumps to the next interval in the sequence. |
| + Difficulty | Increases all remaining interval targets by 5 % of your FTP (stacks). |
| − Difficulty | Decreases all remaining interval targets by 5 % of your FTP (stacks). |
| Lap | Marks a manual lap in the recorded data (useful for free-ride segments). |
| Stop / Finish | Ends the session and opens the post-workout save screen. |
Settings during a workout
Press the gear icon within the workout player to open the in-workout settings panel. From here you can adjust display options — which metrics are visible, timer size, font size — without interrupting the session.
Internet radio
Maximum Trainer includes a built-in internet radio player. Open the settings panel during a workout and navigate to the Radio tab to add a stream URL and adjust volume. Radio plays in the background alongside workout audio cues.
Video player
Desktop builds include a built-in video player (powered by Qt's QtMultimedia) so you can play a local video file (training footage, virtual rides) alongside your workout. Right-click the video area in the workout player to open a file or URL and to adjust the volume.
In the browser (WASM) version, if automatic reconnection fails a Reconnect overlay appears on screen. Click the Reconnect button to trigger a new Web Bluetooth scan and re-pair your trainer.
💾 Saving Your Activity
When you press Stop / Finish (or the workout ends naturally), the post-workout screen appears.
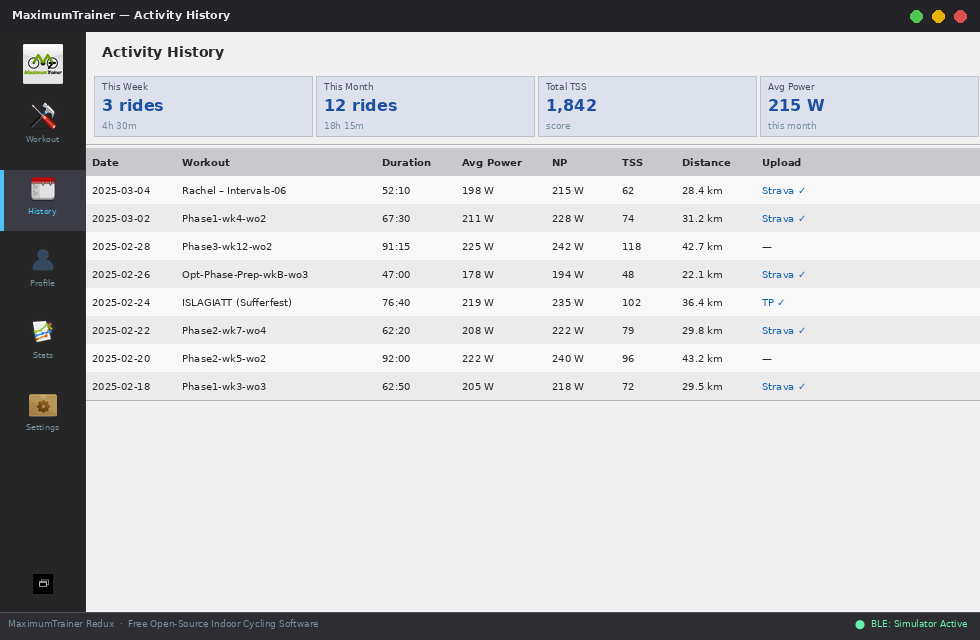
- Review the activity summary — total time, average and normalised power, average HR, TSS, and interval breakdown.
- Edit the activity name if desired (defaults to the workout name + date).
- Click Save to write the activity as a
.fitfile to your configured history folder.
MaximumTrainer / History. You can change the
history folder in Preferences → Folders.
If you choose Discard instead, the raw data is deleted and no file is written. This cannot be undone.
☁️ Uploading to Strava & More
Maximum Trainer can upload completed activities directly to third-party platforms from the post-workout screen — no need to open a web browser or manually transfer files.
Supported platforms
Strava
Authenticate once via OAuth. Activities appear on your Strava feed automatically after uploading.
TrainingPeaks
Link your TrainingPeaks account for seamless TSS, ATL/CTL tracking integration.
SelfLoops
Upload to the SelfLoops analytics platform for advanced power and performance metrics.
Intervals.icu
Sync your planned workouts and optionally auto-upload completed activities — configure in Preferences → Cloud Sync.
Linking a platform (one-time setup)
- Open Preferences → Preferences & Profile.
- Select the Connections tab.
- Click Connect to Strava (or TrainingPeaks / SelfLoops).
- A browser window opens for you to authorise Maximum Trainer. Log in and click Authorise.
- Return to Maximum Trainer — the platform now shows as linked with a green tick.
Uploading after a workout
- On the post-workout summary screen, click the Upload to Strava (or other platform) button.
- Maximum Trainer uploads the
.fitfile. A confirmation message appears when the upload completes.
.fit file from
your activity history. Open the History tab in the main window,
right-click an activity, and choose Upload.
⚙️ Settings
Open Preferences → Preferences & Profile from the menu bar to access the full settings dialog. Settings are organised into tabs.
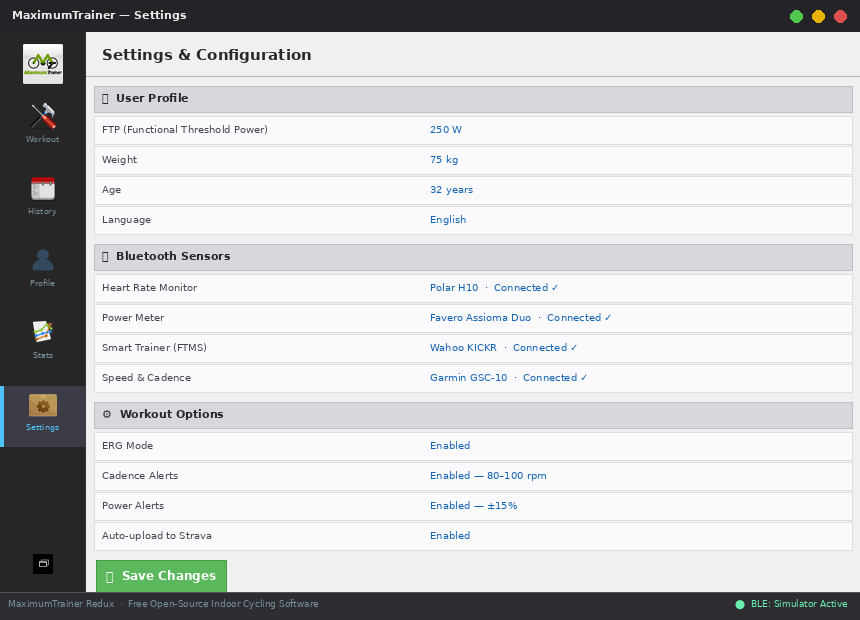
| Tab | What you can configure |
|---|---|
| User Profile | FTP (W), body weight (kg), max heart rate, heart rate zones, display name |
| Display | Which metric widgets are visible during workouts (power, HR, cadence, speed, balance, SmO₂, calories), timer style, font size |
| Trainer | Trainer make/model and power curve calibration (for trainers without native FTMS power reporting) |
| Folders | Workout library folder, activity history folder, course file folder |
| Connections | Link/unlink Strava, TrainingPeaks, SelfLoops accounts; configure Intervals.icu API key, Athlete ID, and auto-upload toggle |
| Radio | Add, edit, and reorder internet radio station URLs |
| Language | Switch the UI language (requires a restart) |
| Logging | Set the minimum log level (Verbose / Debug / Info / Warn / Error), enable or disable writing to a log file, choose the log file path, and open the current log file directly from the dialog. See Log Files & Troubleshooting for OS-specific default paths. |
🏟️ Studio Mode
Studio Mode allows multiple riders to train simultaneously on a single installation — perfect for spinning studios and group training sessions. Each rider has their own BLE device slot and individual metrics display.
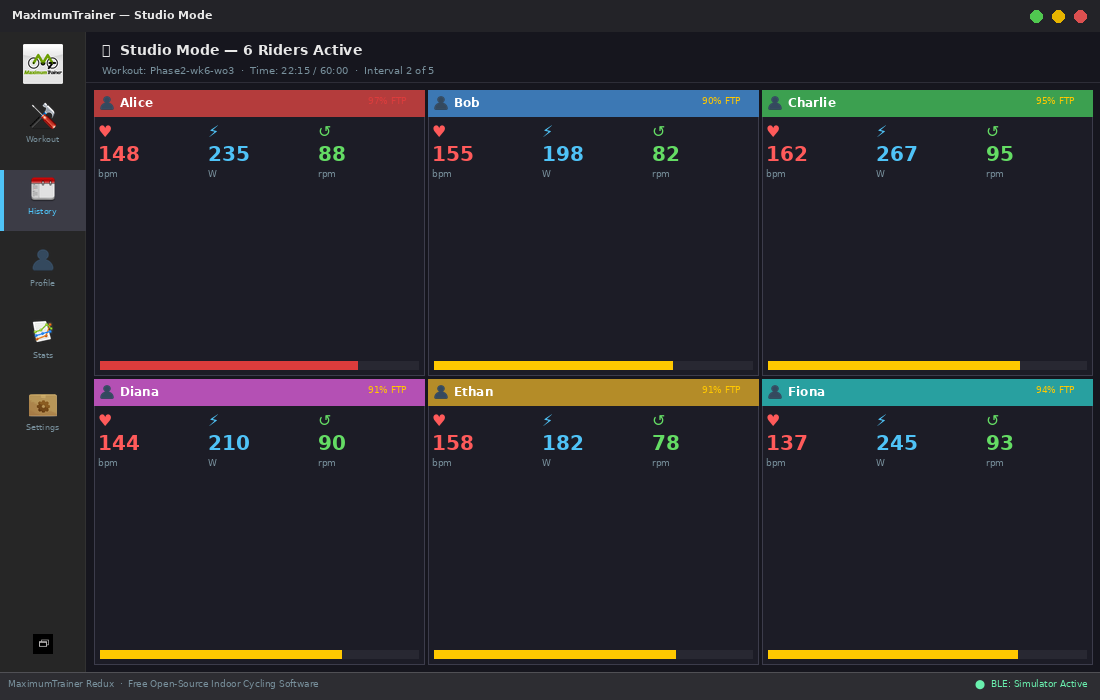
Enabling Studio Mode
- Open Preferences → Preferences & Profile.
- On the Studio tab, toggle Enable Studio Mode.
- Set the number of riders (up to the maximum supported by your hardware).
- For each rider, configure their name, FTP, and assign a BLE device.
- Click Save. The main window now shows a rider panel for each participant.
.fit file. Workout targets are scaled per-rider based on
individual FTP values.
🏆 Achievements
Maximum Trainer awards achievements automatically at the end of a workout based on your performance data. Achievements recognise milestones such as personal power records, streak completions, and training volume targets.
After saving an activity, any newly unlocked achievements are displayed on the post-workout screen. You can review all earned achievements at any time in the History tab of the main window.
🗒️ Log Files & Troubleshooting
Maximum Trainer writes diagnostic messages to a log file whenever file logging is enabled in Preferences → Preferences & Profile → Logging. The log captures all network request errors, BLE connection events, and OAuth login steps, making it the first place to look when something goes wrong.
Enabling the log file
- Open Preferences → Preferences & Profile.
- Select the Logging tab.
- Tick Write log to file.
- Optionally change the log file path with the Browse… button.
- Click OK — logging starts immediately.
Use the Open log file button to open the current log in your default text editor at any time.
Default log file locations
| Platform | Default log file path |
|---|---|
| Windows |
%APPDATA%\MaximumTrainer\MaximumTrainer.loge.g. C:\Users\YourName\AppData\Roaming\MaximumTrainer\MaximumTrainer.log
|
| macOS |
~/Library/Application Support/MaximumTrainer/MaximumTrainer.logHold ⌥ Option and click Go in Finder to reveal the hidden Library folder.
|
| Linux |
~/.local/share/MaximumTrainer/MaximumTrainer.logFollows the XDG Base Directory specification. Override with the $XDG_DATA_HOME environment variable.
|
Troubleshooting the Intervals.icu login page
If the Login with Intervals.icu dialog opens but shows a blank white page or an error message, the OAuth authorization page could not load. Common causes and fixes:
| Symptom | Solution |
|---|---|
| Blank white page |
Check your internet connection. The app needs to reach
https://intervals.icu. If a proxy or firewall is blocking the
domain, add an exception for intervals.icu and
maximumtrainer.com.
|
| "Unable to load page" error message |
The failed URL is shown in the dialog. Copy it and paste it into your browser to
test connectivity directly. Check the log file (see paths above) for a
[WARN] entry from DialogInfoWebView — it will include
the exact network error string.
|
| SSL / certificate error |
Ensure your system clock is correct — a wrong date/time is the most common cause
of SSL failures. On Windows, open Date & Time settings and
click Sync now. Check the log file for
[WARN] MyQWebEnginePage entries.
|
| Login succeeds but app stays at login screen | The token exchange with the MaximumTrainer.com proxy may have failed. Enable Debug logging, reproduce the issue, and attach the log file to a GitHub issue. |
💡 Tips & Shortcuts
Keyboard shortcuts
Press ? or F1 at any time during a workout to view the in-app keyboard shortcuts dialog.
Workout Player
| Key | Action |
|---|---|
| Space | Start / Pause workout |
| → | Skip to next interval |
| + / = | Increase difficulty +5 % |
| - | Decrease difficulty −5 % |
| L | Manual lap |
| F11 | Toggle fullscreen |
| F6 | Radio — previous track |
| F7 | Radio — play / pause |
| F8 | Radio — next track |
| ? / F1 | Show keyboard shortcuts |
| Escape | Exit workout (with confirmation) |
Main Window
| Key | Action |
|---|---|
| Ctrl+, | Open Preferences |
| Ctrl+N | Create new workout |
| Ctrl+Q | Quit application |
| F1 | Show keyboard shortcuts |
Workout Creator
| Key | Action |
|---|---|
| Ctrl+S | Save workout |
| Ctrl+Z | Undo last change |
| Delete | Delete selected interval |
General tips
- Warm up your trainer before calibrating or doing a serious workout. Most direct-drive trainers need 10–15 minutes of easy riding at 100–150 W to reach operating temperature and produce accurate power readings.
- Use simulation mode to preview new workouts and verify that the interval structure is what you expect before committing to the real effort.
- Adjust difficulty on the fly — if a workout is designed at 100 % FTP and you're having a bad day, knock it down by 1–2 presses (−5–10 %) rather than stopping. You'll still get a training benefit and keep the streak alive.
- Set accurate FTP and weight. Incorrect values shift all zone boundaries and make ERG targets too easy or too hard. Update your FTP after every test or ramp test.
- Check for updates regularly via Help → Check for Updates in the menu bar. New trainer profiles and BLE improvements are shipped frequently.
Troubleshooting
| Problem | Solution |
|---|---|
| Sensor not appearing in BLE scanner | Wake the device (pedal / moisten HR strap), bring it closer, and click Rescan. On Linux, ensure the bluetooth group membership and BlueZ daemon are correct. |
| ERG resistance not changing | Ensure the trainer is connected with the FTMS (0x1826) profile, not a plain Power profile. A plain Power profile provides data but does not accept load commands. |
| ERG not working in browser (WASM) version | The browser version sends an FTMS Request Control handshake automatically after connection. If ERG commands are still ignored, disconnect and reconnect your trainer — some trainers require a fresh GATT connection to accept the control handshake. |
| Power readings seem inaccurate | Spin-down / calibrate the trainer from its own app, then reconnect in Maximum Trainer. If your trainer uses a built-in power curve, verify the correct model is selected in Preferences → Trainer. |
| App won't connect after a BLE disconnect | Maximum Trainer retries automatically (up to 3 times, 5-second intervals). If reconnection fails, toggle Bluetooth off/on in your OS and click Reconnect in the notification bar. |
| Upload to Strava fails | Re-link your Strava account in Preferences → Connections. OAuth tokens expire; re-linking refreshes them. |
🖥️ Platform Requirements
Maximum Trainer is supported on Windows, macOS, and Linux. The BLE requirements differ slightly per operating system.
| Platform | Minimum OS | Notes |
|---|---|---|
| Windows | Windows 10 version 1703 (Creators Update) or later | Requires a Bluetooth 4.0+ adapter with a WDM-compatible driver. Windows 7, 8, and 8.1 are not supported (missing WinRT BLE APIs). No special permissions or manifest entries are needed. |
| Linux | Ubuntu 20.04+ / kernel 5.x+ |
Your user account must be in the bluetooth group:
sudo usermod -aG bluetooth $USER (log out and back in to apply).
The BlueZ daemon must be running: sudo systemctl enable --now bluetooth.
See the Linux Bluetooth Setup
section of the README for full details.
|
| macOS | macOS 10.15 (Catalina) or later | On first connection, macOS will prompt for Bluetooth permission (NSBluetoothAlwaysUsageDescription). Click Allow to grant access. This permission can be reviewed in System Settings → Privacy & Security → Bluetooth. Requires a Mac with built-in Bluetooth or a BT 4.0+ adapter. |
| Browser (WASM) | Chrome 85+ or Edge 85+ |
Requires the
Web Bluetooth API
— available in Chrome and Edge (not Firefox or Safari). The page must be served
over HTTPS. BLE pairing must be triggered by a user gesture (clicking
Start Workout). No local file access; activities cannot be
exported to a local .fit file in the browser version.
|